Requirements:
- RoofQuote PRO® active subscription
- Google Tag Manager account
- Google Analytics account with GA4 Property
- Google Ads Account (Optional)
- Meta Business Account (Optional)
Overview:
RoofQuote PRO® is designed to emit JavaScript events from the tool, making it possible to track your users' interactions from within the tool. Tracking these interactions through Google Tag Manager will allow you to:
- Gather more insights about people using your tool and track key (conversion) events in GA4
- Leverage conversions to optimize your ad campaigns (Meta, Google Ads, TikTok)
- Enhance attribution through storing data for each session
PRO TIP: Skip the guesswork—generate your setup instantly with our GTM Setup Generator and drop the container straight into your GTM.
Jump to a section:
Instructions:
-
Create a Variable to Detect the Widget
Since we only need GTM to fire tracking scripts on pages that have the RoofQuote PRO® widget embedded, let's create a variable to track when the widget is present on the page.
-
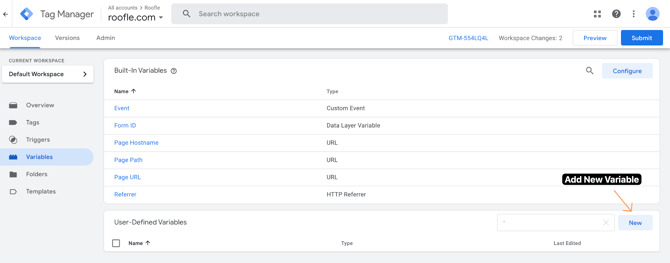
- In Google Tag Manager, go to Variables → Click New.
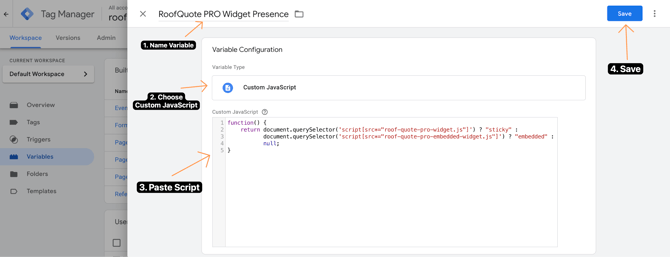
- Name the variable:
RoofQuote PRO Widget Presence - Click Variable Configuration → Select Custom JavaScript.
- Copy and paste this code:
function() {return document.querySelector('script[src*="roof-quote-pro-widget.js"]') ? "sticky" :document.querySelector('script[src*="roof-quote-pro-embedded-widget.js"]') ? "embedded" : null;}
- Click Save.
✅ This variable will return:
"sticky"if the slide-out widget is found."embedded"if the on-page widget is found.nullif no widget is present on the page.
-
Create a Variable to Detect the Widget
Since we only need GTM to fire tracking scripts on pages that have the RoofQuote PRO® widget embedded, let's create a variable to track when the widget is present on the page.
1️⃣ Add a Custom JavaScript Variable
In Google Tag Manager, go to Variables → Click New.
- Name the variable: RoofQuote PRO Widget Presence
- Click Variable Configuration → Select Custom JavaScript.
- Copy and Paste this code:
-
function() {
    return document.querySelector('script[src*="roof-quote-pro-widget.js"]') ? "sticky" :
           document.querySelector('script[src*="roof-quote-pro-embedded-widget.js"]') ? "embedded" :
           null;
}
-
-
Click Save.

✅ This variable will return:
-
- "sticky" if the slide-out widget is found.
- "embedded" if the on-page widget is found.
- null if no widget is present on the page.
Step 2: (Option 1) Create a Trigger for Pages with the Widget
Next, let's create a trigger that fires only on pages where the widget is present.
2️⃣ Set Up the GTM Trigger
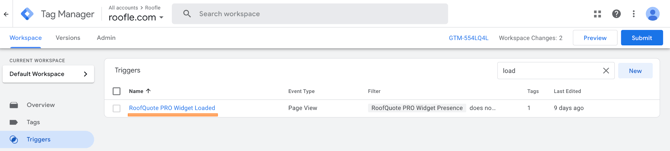
Go to GTM → Triggers → Click New.

- Name it:
RoofQuote PRO Widget Loaded - Trigger Type: Select Page View.
- Trigger Condition:
- Select "Some Page Views".
- Set the condition:
RoofQuote PRO Widget Presencedoes not equalnull
- Click Save.
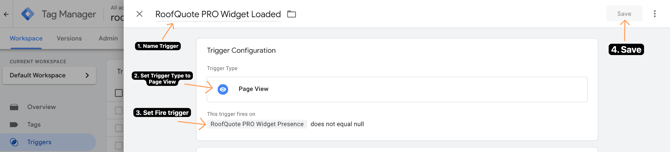
✅ This trigger ensures that GTM only loads the tracking script when the widget exists.
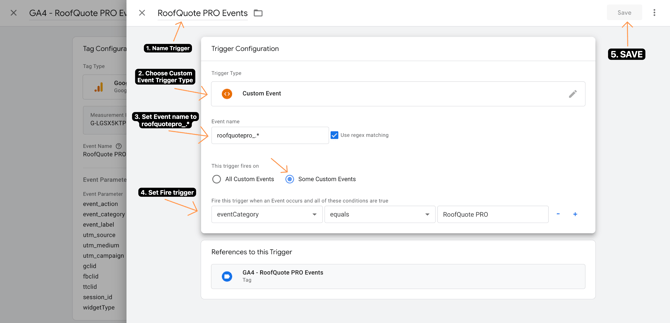
Step 2: (Option 2) Create a Custom Event Trigger
This is the preferred method for WIX websites or anytime an iframe is used to embed the widget rather than the widget scripts
Go to Triggers → Click New.
- Name the variable: RoofQuote PRO Events
- Set
Event namematches regex^roofquotepro_.* - Fire on All Custom Events
On your WIX parent page, add this script to listen for RoofQuote PRO Events:
// On the parent Wix page
window.addEventListener("message", function(event) {
  if (event.data.event === "roofquotepro_viewed") {
    window.dataLayer = window.dataLayer || [];
    dataLayer.push({
      event: event.data.event,
      widgetType: event.data.widgetType
    });
  }
});
Step 3: Create a Tag to Track Events
Now, let's set up a Custom HTML Tag that listens for events and sends them to GTM.
3️⃣ Add the Tracking Script in GTM
Go to GTM → Tags → Click New.
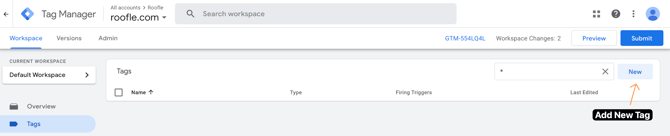
- Name the tag:
RoofQuote PRO Tracking Script - Choose Tag Type: Select Custom HTML
- Paste this code:
-
<script>
(function() {
    window.dataLayer = window.dataLayer || [];

    function captureQueryParams() {
        var params = new URLSearchParams(window.location.search);
        var trackingParams = ["utm_source", "utm_medium", "utm_campaign", "gclid", "fbclid", "ttclid"];

        for (var i = 0; i < trackingParams.length; i++) {
            var param = trackingParams[i];
            if (params.has(param)) {
                sessionStorage.setItem(param, params.get(param));
            }
        }

        if (!sessionStorage.getItem("session_id")) {
            sessionStorage.setItem("session_id", Math.random().toString(36).substr(2, 9));
        }
    }

    function listenForWidgetEvents() {
        window.addEventListener("message", function(event) {
            if (event.origin.indexOf("app.roofle.com") === -1) return;

            console.log("Received event from widget:", event.data.event); // ✅ Debugging Log

            var widgetType = document.querySelector('script[src*="roof-quote-pro-widget.js"]') ? "sticky" :
                             document.querySelector('script[src*="roof-quote-pro-embedded-widget.js"]') ? "embedded" : "unknown";

            var eventMapping = {
                "Roof-quote-pro-viewed": "roofquotepro_viewed",
                "Address-loaded": "roofquotepro_address_loaded",
                "Contact-form-displayed": "roofquotepro_lead_form_displayed",
                "Get-help-form-displayed": "roofquotepro_other_contact_form_displayed",
                "Get-help-form-submitted": "roofquotepro_other_contact_submitted",
                "Contact-form-submitted": "roofquotepro_lead_submitted",
                "Product-requested-cta": "roofquotepro_product_requested"
            };

            var eventName = eventMapping[event.data.event];

            if (eventName) {
                console.log("Pushing to dataLayer:", eventName); // ✅ Debugging Log

                dataLayer.push({
                    event: eventName,
                    eventCategory: "RoofQuote PRO",
                    eventAction: eventName.replace("roofquotepro_", "").replace(/_/g, " "),
                    eventLabel: "RoofQuote PRO Widget",
                    utm_source: sessionStorage.getItem("utm_source") || "",
                    utm_medium: sessionStorage.getItem("utm_medium") || "",
                    utm_campaign: sessionStorage.getItem("utm_campaign") || "",
                    gclid: sessionStorage.getItem("gclid") || "",
                    fbclid: sessionStorage.getItem("fbclid") || "",
                    ttclid: sessionStorage.getItem("ttclid") || "",
                    session_id: sessionStorage.getItem("session_id") || "",
                    timestamp: new Date().toISOString(),
                    widgetType: widgetType
                });
            } else {
                console.warn("Event not mapped:", event.data.event); // ❌ Logs if an unknown event is received
            }
        });
    }

    captureQueryParams();
    listenForWidgetEvents();
})();
</script>
-
- Triggering: Select the
RoofQuote PRO Widget LoadedorRoofQuote PRO Eventstrigger you created in Step 2. - Click Save.
![]()
![]()
Step 4: Set Up Data Layers to Extract Data in GTM
Now that the script is listening for events, we configure GTM to extract data and push those events into Google Analytics 4 (GA4).
4️⃣ Create Data Layer Variables
Go to GTM → Variables → Click New.
-
Create these Data Layer Variables:
Variable Name Data Layer Variable Name eventCategoryeventCategoryeventActioneventActioneventLabeleventLabelutm_sourceutm_sourceutm_mediumutm_mediumutm_campaignutm_campaigngclidgclidfbclidfbclidsession_idsession_idwidgetTypewidgetType
Example Data Layer:
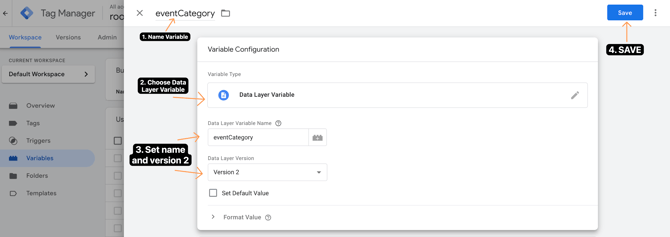
- Name the Variable using the Variable Name column shown above
- Choose Data Layer Variable
- Set the Data Layer Variable Name the same name as the Variable Name and set the Layer Version as Version 2.
- Click Save then repeat for each Data Layer in the column below
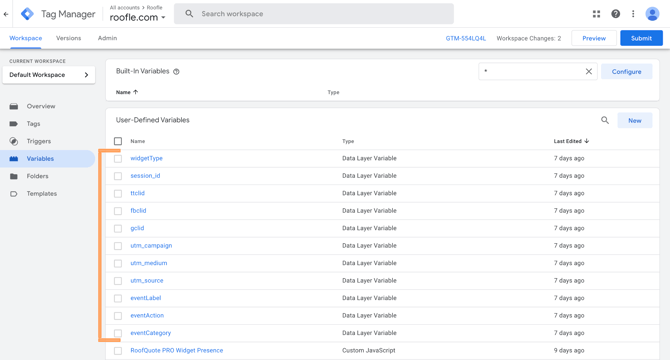
Your data layer variables will look like this:
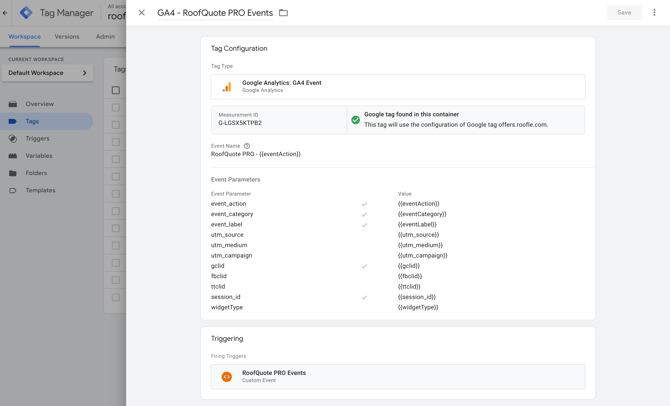
Step 5: Send Events to Google Analytics 4 (GA4)
5️⃣ Create GA4 Event Tag
Go to GTM → Tags → Click New.
-
Name the tag:
GA4 - RoofQuote PRO Events -
Choose Tag Type: Select Google Analytics: GA4 Event
- Measurement ID: Paste your GA4 Data Stream Measurement ID
- Name Event:
RoofQuote PRO - {{eventAction}} -
Configure the Event Parameters:
Parameter Value category{{eventCategory}}action{{eventAction}}label{{eventLabel}}utm_source{{utm_source}}utm_medium{{utm_medium}}utm_campaign{{utm_campaign}}gclid{{gclid}}fbclid{{fbclid}}session_id{{session_id}}widget_type{{widgetType}}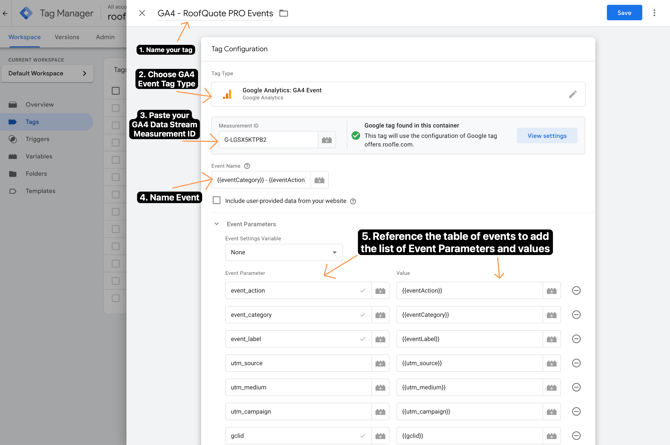
-
Triggering: Include the following Custom Event Trigger:
Event namematches regex^roofquotepro_.*- Fire on All Custom Events or specify Some Custom Events
- For instance
eventCategoryequalsRoofQuote PRO
- For instance
- Fire on All Custom Events or specify Some Custom Events
Step 6: Test & Publish
- Click "Preview" in GTM and test on a page with the widget.
- Open Google Tag Manager Debug Mode and check if:
RoofQuote PRO Widget Presencereturns"sticky"or"embedded".- The
RoofQuote PRO Tracking Scripttag fires only on widget pages. - GA4 receives the following events:
RoofQuote PRO - viewedRoofQuote PRO - address_loadedRoofQuote PRO - lead_form_displayedRoofQuote PRO - lead_submittedRoofQuote PRO - product_requestedRoofQuote PRO - other_contact_form_displayedRoofQuote PRO - other_contact_submitted
- If all works correctly, Click Submit → Publish in GTM.
✅ Once your events are set up, move to Google Ads & Facebook Ads tracking.
🎯 GTM Tracking for RoofQuote PRO® Conclusion
✅ Optimized tracking → No unnecessary scripts on non-widget pages.
✅ Improved marketing attribution → Captures UTM, GCLID, session IDs.
✅ Zero developer effort for contractors → Works dynamically.
Platform Conversion Tracking
Send Your Conversions to Google Ads (Two Ways to Connect)
Step 7 (Option 1): Send GA4 Conversions to Google Ads
GA4 can send conversions automatically to Google Ads if linked properly.
Link GA4 to Google Ads
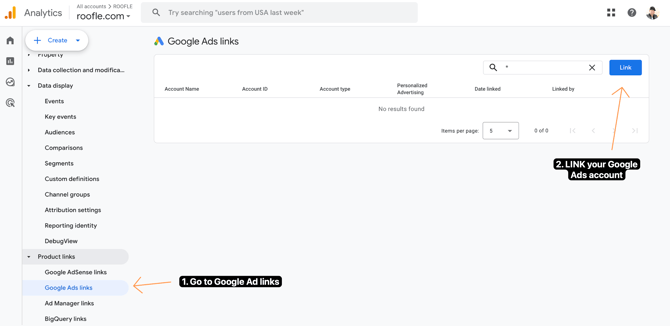
- Go to Google Analytics → Admin.
- Under Product Links, select Google Ads Links.
- Click "Link" → Select Your Google Ads Account → Click Confirm & Save.
✅ This ensures GA4 sends conversions directly to Google Ads.
Mark as Key Events for Conversion Tracking
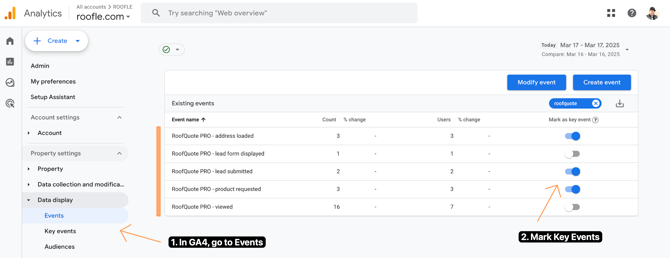
- In GA4 → Admin → Events, mark the following as key events:
RoofQuote PRO - address_loadedRoofQuote PRO - lead_submittedRoofQuote PRO - product_requested - Toggle ON "Mark as Key Event".
✅ This ensures Google Ads sees the event as a conversion.
Import GA4 Conversions into Google Ads
- Go to Google Ads → Goals → Click Conversions → Summary
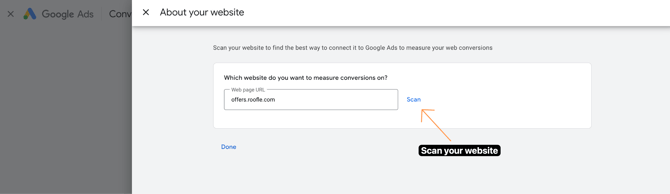
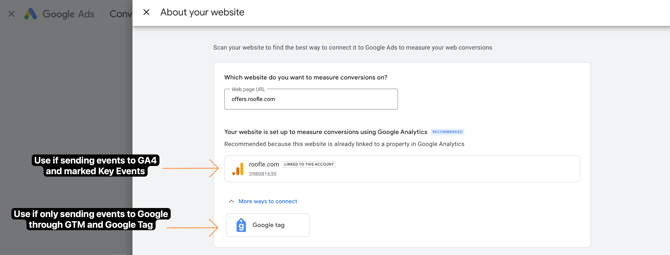
- Click New Conversion Action
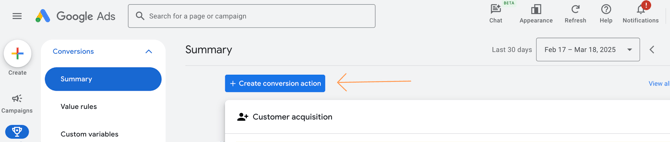
- If necessary, make sure your Google Tag is linked via GA4 or Google Tag → Click scan to find your tracking tags

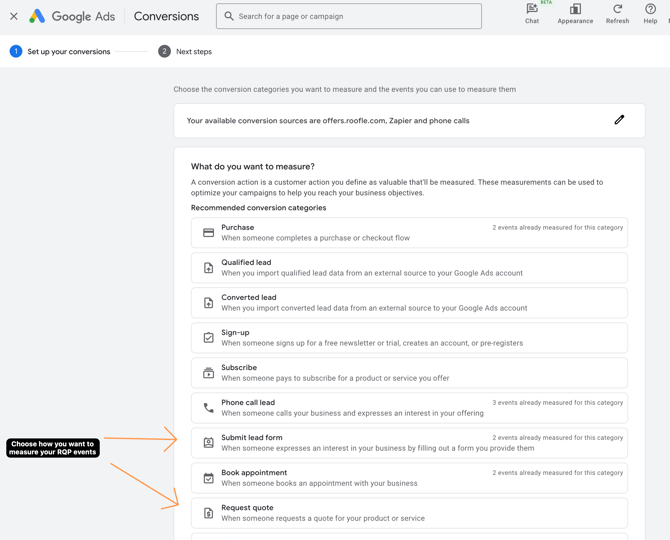
- Choose a conversion action to measure (e.g. Submit lead form or Request Quote)
- Select Google Analytics 4 Property as conversion source → Click Setup
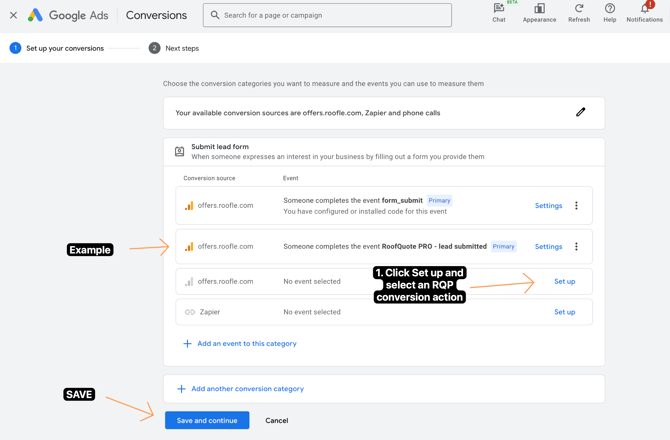
- Select your Key conversion events
- Save and continue
✅ Now, Google Ads will track GA4 conversions.
Step 7 (Option 2): Send Conversions Directly to Google Ads via GTM (Google Ads Conversion Tracking Tag)
For faster & direct tracking, use GTM to send Google Ads conversions.
Create a Google Ads Conversion Tracking Tag
- Go to GTM → Tags → Click New.
- Tag Type: Select Google Ads Conversion Tracking.
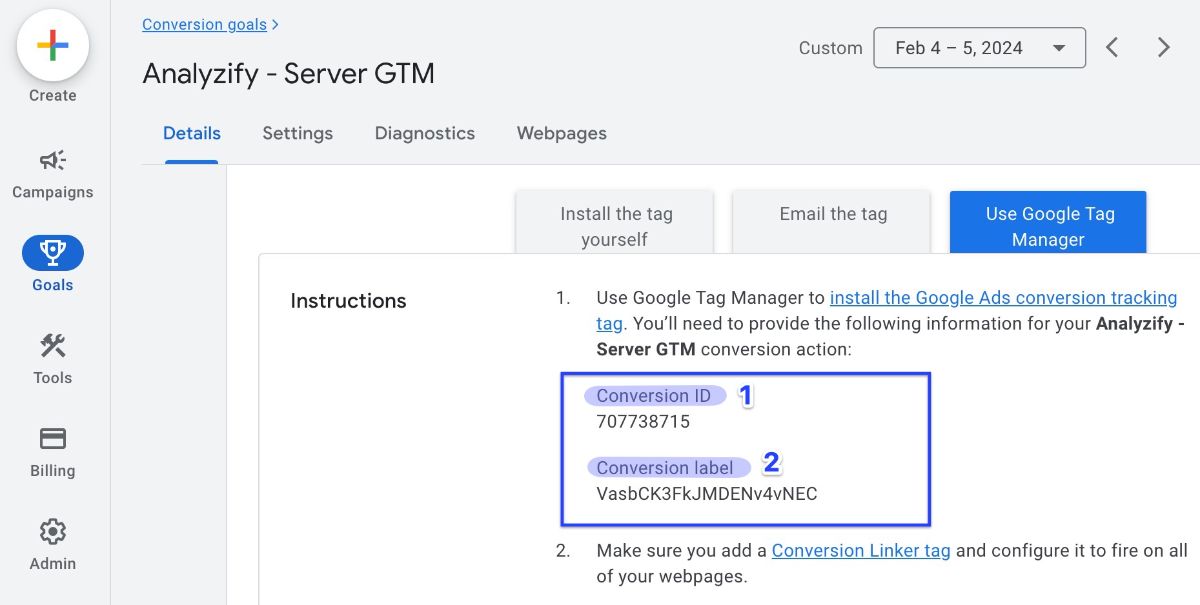
- Enter Your Google Ads Conversion ID & Label (from Google Ads → Goals → Summary → Click a Conversion Action you want to track → Use Google Tag Manager)
- Triggering: Trigger on RoofQuote PRO events
Make sure you also have a Google Conversion Linking Tag
- Go to GTM → Tags → Click New.
- Tag Type: Select Google Ads Conversion Linker.
- Triggering: Fire on All Pages
✅ Now, conversions fire directly in Google Ads via GTM.
Step 8: Send Conversions to Facebook (Meta) Ads
To send conversions to Facebook Ads, you need the Meta Pixel & Conversions API.
Verify Facebook (Meta) Pixel Is Installed
- Go to Meta Business Manager → Events Manager.
- Select your Pixel ID and check if it’s receiving data.
- If not installed, add the Meta Pixel via GTM.
Add Meta Pixel via GTM
- Go to GTM → Tags → Click New.
- Tag Type: Select Custom HTML.
- Paste this code (replace YOUR_PIXEL_ID):
<script>
  !function(f,b,e,v,n,t,s)
  {if(f.fbq)return;n=f.fbq=function(){n.callMethod?
  n.callMethod.apply(n,arguments):n.queue.push(arguments)};
  if(!f._fbq)f._fbq=n;n.push=n;n.loaded=!0;n.version='2.0';
  n.queue=[];t=b.createElement(e);t.async=!0;
  t.src=v;s=b.getElementsByTagName(e)[0];
  s.parentNode.insertBefore(t,s)}(window, document,'script',
  'https://connect.facebook.net/en_US/fbevents.js');
  fbq('init', 'YOUR_PIXEL_ID');
  fbq('track', 'PageView');
</script> - Triggering: Select the
RoofQuote PRO Widget Loadedtrigger you created in Step 2. - Trigger: Fire on All Pages.
- Click Save & Publish.
Send Facebook Conversion Events via GTM
![]()
- Go to GTM → Tags → Click New.
- Tag Type: Select Custom HTML.
- Paste this code (for a lead event):
<script>
  fbq('track', 'Lead');
</script> - Trigger: Use the same conversion trigger as Google Ads (e.g.,
lead_submitted). - Click Save & Publish.
✅ Now, Facebook receives lead events directly from GTM.
Step 9: Use Facebook Conversion API
(Server-Side for Better Tracking)
For better conversion tracking (bypassing ad blockers), set up Facebook Conversions API (CAPI).
9️⃣ Enable CAPI in Facebook Business Manager
- Go to Meta Events Manager → Select Your Pixel.
- Click Settings → Find Conversions API.
- Click Choose a Partner → Select Google Tag Manager.
- Follow the setup instructions.
✅ This allows Facebook Ads to receive conversions via server-side tracking.
🔥 Final Checklist:
| Tracking Method | Done? |
|---|---|
| GTM is tracking RoofQuote PRO events | ✅ |
| GTM is sending data to GA4 | ✅ |
| GA4 is tracking conversions (address_loaded, lead_submitted, product_requested, etc.) |
✅ |
| GA4 is linked to Google Ads (Admin → Product Links) | ✅ |
| Google Ads is importing GA4 conversions | ✅ |
| GTM has a Google Ads Conversion Tag (for direct tracking) | ✅ |
| Meta Pixel is installed via GTM | ✅ |
| Meta Pixel sends Lead Events via GTM | ✅ |
| Facebook Conversion API (CAPI) is set up (optional but recommended) | ✅ |